When I first lit up my backyard with a few well-placed outdoor landscape lights, I didn’t just see the yard — I saw possibility. A cozy lounge by the fire pit invited friends into the garden as shadows danced across the trees.
If you’ve ever wished your yard could feel like a destination — not just a lawn — you’re in the right place. In this guide, I’ll show you how to use outdoor landscape lights to transform your space, impress guests, and create a breathtaking outdoor experience.
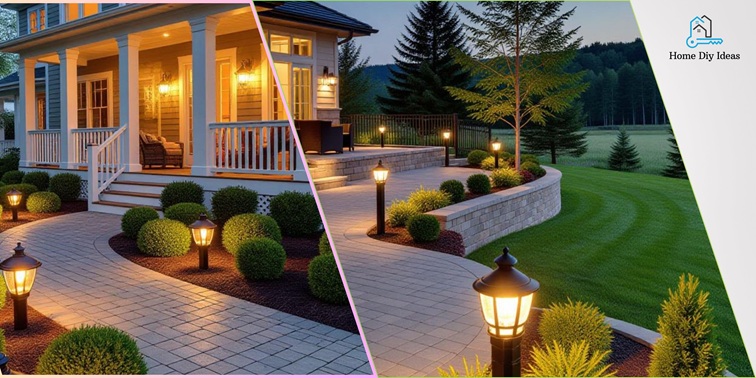
Why Outdoor Landscape Lights Matter
I’ve seen countless yards look lifeless after sunset — beautiful in daylight, invisible at night. Well-planned lighting changes that completely.
Here’s what great outdoor lighting delivers:
- Ambience & mood: Lighting sets the tone — warm, inviting, and magical.
- Function & safety: Illuminates walkways, steps, and entertaining areas.
- Highlighting features: Brings trees, walls, and water features to life.
- Extended enjoyment: Lets you entertain long after sunset.
Step-by-Step Landscaping Ideas & Design Insights
Step 1: Define Your Lighting Zones
Walk around your yard and note how each space is used. Group these into zones:
- Entry & Pathway: Welcome guests and guide them safely.
- Seating & Entertainment Areas: Set an inviting atmosphere for gatherings.
- Feature Zones: Highlight trees, sculptures, or water features.
- Perimeter & Background: Add soft ambient glow to frame your landscape.

Step 2: Choose the Right Fixture Types
Use this reference table to match light type to zone:
| Zone | Fixture Type | Purpose |
| Pathway | Low-voltage path or stake lights | Guides guests safely |
| Trees or Tall Features | Uplight or spotlight | Creates drama and texture |
| Seating Area | Downlight or hanging pendant | Provides ambient comfort |
| Façade or Wall | Wash or wall-mounted light | Highlights architecture |
| Perimeter/Background | Bollard or hidden LED strips | Defines boundary with soft glow |
Pro Tip: Brass and copper fixtures last much longer and weather beautifully — worth the investment over plastic models.
Step 3: Plan Your Layout & Wiring
Use a simple sketch to visualize your lighting design.
Quick Checklist:
- Mark fixture positions on your yard plan.
- Keep wiring routes safe and hidden.
- Choose the correct transformer size — avoid overload.
- Opt for LED fixtures (energy-efficient and long-lasting).
- Consider timers or smart controls for convenience.
Step 4: Layer Your Lighting for Depth
Professional designers use three layers of light for balance:
- Ambient Light: Soft general glow that makes spaces feel comfortable.
- Accent Light: Highlights objects, textures, and plants for depth.
- Task Light: Provides practical illumination for paths and seating.
Blending these layers gives your yard dimension and atmosphere without harsh glare.
Step 5: Select Color Temperature & Brightness
In my experience, warm white light (2700-3000 K) is perfect for creating an inviting outdoor feel.
Avoid overly bright or cold lighting — it flattens textures and feels artificial.
If possible, install dimmers or smart controls so you can adjust lighting based on occasion or mood.
Step 6: Install & Fine-Tune
Lighting design is both science and art. Once installed:
- Start with one area (like a pathway) and view it at dusk.
- Adjust fixture angles to minimize glare.
- Keep spacing consistent for rhythm and symmetry.
- Revisit every few months to clean lenses and adjust for plant growth.
Step 7: Create the ‘Wow’ Factor for Guests
Want your lighting to truly impress? Add one or two “hero” elements:
- A softly lit tree canopy or water feature as a focal point.
- Hidden under-bench or stair lighting for surprise impact.
- Subtle color shifts for parties or seasonal moods.
- Layered glow that makes your yard feel larger and more welcoming.
Quick Homeowner’s Checklist
- Map your lighting zones.
- Select fixture types per zone.
- Invest in durable materials (brass or copper).
- Plan wiring and transformer capacity.
- Use ambient + accent + task layers.
- Pick warm white LEDs for a cozy look.
- Test and adjust at dusk.
- Add at least one signature lighting feature.
- Schedule seasonal maintenance.
FAQ: Common Outdoor Lighting Questions
Yes — basic low-voltage or solar setups are DIY-friendly. For complex designs, hire a licensed electrician or lighting designer for safety and precision.
A mid-size yard can cost anywhere between $1,500–$4,000 depending on fixture quality, layout complexity, and installation method.
Solar lights are convenient but less consistent in brightness. For strong, long-lasting results, wired LED systems perform best.
Clean lenses regularly, check wiring connections annually, and trim plants that block beams. Replace bulbs with identical wattage for consistency.
Absolutely. Quality landscape lighting enhances curb appeal, safety, and nighttime usability — all factors buyers appreciate.
Conclusion
You don’t need to be a professional designer to create an enchanting outdoor space. Start by defining your zones, selecting durable fixtures, and layering your lights for warmth and depth.Picture this: guests arriving on a softly lit pathway, conversations under a gentle glow, your garden alive with depth and dimension. That’s the transformation outdoor landscape lights can bring.


