
When I hid behind my house to retrieve a fallen garden tool the other night, I realized how dark the path behind our home really is. At that moment, I made a decision — no more stumbling in the dark. That’s why I dove deep into the world of landscape path lighting. If you, like me, want to blend beauty, safety, functionality, and a little bit of magic into your outdoor spaces, you’re in the right place.
In this post, I’ll walk you through expert-level ideas for landscape path lighting, sharing creative solutions I’ve gathered (and tested) from real experience. I’ll also include insights missing from top competitor articles, so you get original, practical, and inspiring advice.
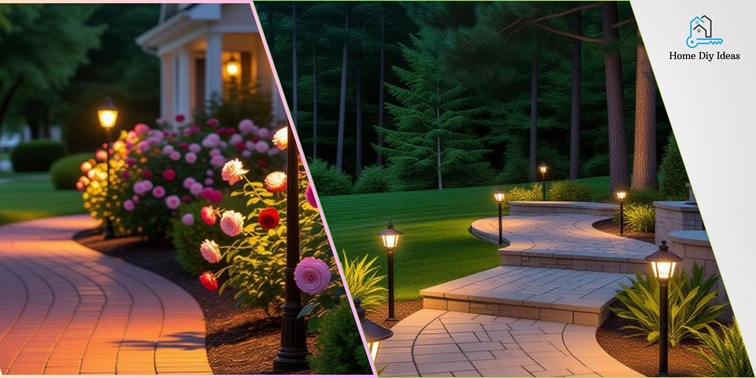
Why Landscape Path Lighting Matters
When I first considered lighting our garden path, I underestimated how transformative it could be. Here’s why it’s worth your time:
- Safety & Accessibility – A well-lit walkway prevents trips and falls, especially at dusk or in rainy weather.
- Ambience & Aesthetics – The right lighting turns a simple path into a captivating nighttime feature.
- Curb Appeal & Value – Professionally styled path lighting adds beauty and boosts your home’s perceived value.
My design goals were simple: visibility, vibe, and value.
Step-by-Step Guide: Planning Your Landscape Path Lighting
Step 1: Map Your Path and Assess the Terrain
- Walk your path at twilight to identify dark spots or curves.
- Sketch your path layout, noting steps, plants, or uneven areas.
- Decide if your path is straight or winding—this affects lighting style.
Step 2: Choose Lighting Techniques
Here’s a quick overview of effective lighting techniques and when to use them:
| Technique | Description | Best For |
| Stake Path Lights | Simple lights placed along the path edges | Straight paths and DIY projects |
| Moonlighting | Light fixtures mounted high (trees or eaves) to mimic natural moonlight | Tree-lined or wooded paths |
| Recessed In-Ground Lights | Lights set flush into the surface or edge | Driveways or heavy-traffic areas |
| Linear Strip Lighting | LED strips built into borders or hardscape edges | Modern, sleek landscapes |
| Accent Border Lighting | Soft lighting highlighting plants or edging | Mood and decorative effects |
Step 3: Select Fixtures and Power Sources
- Choose between low-voltage wired, solar, or line-voltage systems.
- LED fixtures are best for energy efficiency and long life.
- Select warm white (2700–3000 K) color temperature for an inviting feel.
- Make sure fixtures are outdoor-rated for weather and moisture.
- Plan your power setup: transformer, wiring path, and smart timers if desired.
Step 4: Determine Spacing and Placement
- Avoid the “runway” effect—space lights 6–8 feet apart for natural balance.
- Add more lights on curves or near steps for safety.
- Keep fixtures clear of dense plants to prevent light blockage.
- Mark light positions with small flags before installation.
Step 5: Install and Test
Installation Checklist:
- Turn off power (for wired setups)
- Lay wiring or plan solar placements
- Install fixtures and secure them in soil or hardscape
- Connect to power source or transformer
- Test lighting at dusk
- Adjust angles to reduce glare
- Set timers or smart controls
Step 6: Fine-Tune and Maintain
- Clean lenses regularly and trim surrounding plants.
- Re-level fixtures that shift after rain or frost.
- Replace bulbs only with the correct wattage or LED type.
- Review annually for brightness consistency and wiring safety.
Creative Ideas for Path Lighting
- Plant-Bed Uplighting – Place low uplights beside the path to highlight nearby plants and textures.
- Step-Riser Lighting – Embed strip lights into stair risers for a professional, elegant touch.
- Tree-Mounted Moonlights – Cast soft light downward for a natural moonlit look.
- Smart Lighting Control – Use dimmers or dusk sensors for automatic ambience and energy savings.
- Layered Lighting Design – Combine path, accent, and garden lighting for depth and dimension.
Pre- and Post-Installation Checklist
Before Installation:
- ☐ Measure path length and width
- ☐ Choose lighting technique and fixture style
- ☐ Decide on power source
- ☐ Mark placement points
- ☐ Check local codes or HOA rules
After Installation:
- ☐ Test lights after sunset
- ☐ Adjust glare and spacing
- ☐ Clean lenses and trim foliage
- ☐ Verify safe wiring
- ☐ Set timer or automation schedule
FAQ: Real Homeowner Concerns
Yes, but solar lights are often dimmer and less consistent. They work well for short or decorative paths, not main walkways.
Aim for soft, even lighting. Around 100–300 lux is ideal for walkways, but balance is more important than raw brightness.
Aim lights downward, use shields, and select warm tones. Avoid over-lighting or upward beams.
Yes, with low-voltage cabling or discreet solar fixtures. Just ensure waterproof connections and secure wiring.
Expect anywhere from $30–$100 per fixture for DIY setups. Professionally installed systems can range higher depending on design complexity.
Choose outdoor-rated, sealed lights and place them above areas that flood or accumulate debris.
Conclusion
If your path still disappears into darkness at night, now’s the perfect time to change that. With thoughtful landscape path lighting, you’ll enhance both safety and beauty while creating a welcoming glow that transforms your yard.


