![Front Yard Magic: 15 Beautiful Ways to Upgrade Your Home’s Entrance [Front Yard Landscaping Ideas]](https://homediyideas.com/wp-content/uploads/2025/10/Front-Yard-Magic-15-Beautiful-Ways-to-Upgrade-Your-Homes-Entrance-Front-Yard-Landscaping-Ideas.jpg)
I still remember the mix of excitement and dread stepping into my first house as a homeowner. The front walkway was a cracked, straight line of concrete, the shrubs were overgrown sentinels blocking the windows, and the entire entrance felt… apologetic. It lacked personality. Over several seasons, I became a student of my own property, experimenting with pathways, lighting, focal plants, and sculptural elements. I made mistakes—planting a willow too close to the sewer line, underestimating a drainage issue—but I learned. Gradually, I transformed that bland entry into a approach that felt inviting, framed, and alive every single day.
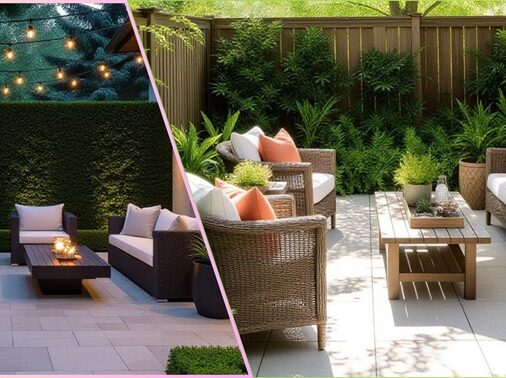
Your front yard isn’t just the green space you mow on Saturdays; it’s the first act of your home’s story. Done well, it captivates visitors, signals meticulous care, and positively shapes your mood even before you turn the key. Done poorly, it becomes a constant, low-grade liability: muddy walks, choking overgrowth, or a graveyard of failed plants.
A thoughtfully designed entrance creates a powerful first impression. (Credit: HomeDIYIdeas)
In this guide, I’ll walk you through 15 beautiful, strategic ways to upgrade your home’s entrance, combining big-picture design principles with the tactical, from-the-trenches steps I’ve used myself. Whether you have a postage-stamp lot or a generous front lawn, you’ll find adaptable, executable ideas that balance beauty with real-world maintenance.
Why Your Front Yard Entrance Matters: More Than Just Curb Appeal
Before we dive into the “how,” let’s talk about the “why.” A well-designed entrance does more than please the neighbors. It:
- Increases Property Value: A polished landscape can boost your home’s value by up to 20%, with the entrance being a critical focal point for appraisers and buyers alike.
- Enhances Safety and Function: Proper lighting, stable walkways, and clear sightlines prevent trips and falls, making your home safer for everyone.
- Creates a Sense of Arrival: It marks the transition from the public street to your private sanctuary, setting a calming, welcoming tone.
- Supports Local Ecology: By choosing native plants, you can create a beautiful habitat for pollinators like bees and butterflies.
15 Beautiful & Strategic Upgrades for Your Front Yard Entrance
Here are 15 transformative ideas, organized from foundational (layout and structure) to aesthetic (plants and fine details). While you can mix and match, I strongly recommend starting with structure and circulation first—it’s the bones upon which everything else is built.
| # | Upgrade | Why It’s a Game-Changer | Execution & Pro Tips |
|---|---|---|---|
| 1 | Create a “Gateway” Frame (Arbor, Pergola, Columns) | Instantly creates vertical interest and a psychological threshold, framing the journey to your door. | Use weather-resistant cedar, powder-coated steel, or composite. Secure with concrete footings below the frost line. Plan for climbers like clematis or star jasmine. |
| 2 | Reimagine the Walkway (Meandering vs. Straight) | Guides the visitor’s experience. A gentle curve feels more natural and inviting than a harsh straight line. | Materials matter: flagstone for organic charm, pavers for modular repair, decomposed granite for cost-effective blendability. Embed stepping stones in ground cover for a cottage feel. |
| 3 | Layered Planting at Multiple Heights | Adds depth, visual richness, and year-round structure. Prevents a flat, two-dimensional look. | Employ the “Thriller, Filler, Spiller” method in beds: a small tree (thriller), mid-height shrubs (filler), and low groundcover (spiller). |
| 4 | Seasonal Interest (4-Season Plant Palette) | Ensures your yard has charm beyond spring and summer, providing beauty even in winter’s dormancy. | Combine evergreens for structure, plants with winter berries (Winterberry Holly), spring bulbs, and trees with stunning autumn foliage (Japanese Maple). |
| 5 | Accent Lighting & Shadow Play | Extends your home’s beauty into the evening, enhances safety, and adds a layer of drama and magic. | Layer lighting: uplights for trees/architecture, path lights for safety, and silhouette lighting for drama. Stick to warm white (2700-3000K). |
| 6 | Use Hardscape Accents (Boulders, Retaining Walls) | Adds a sense of permanence, contrast, and natural texture. Can solve problems like erosion. | Choose local stone where possible to tie into the regional palette. Use scale appropriately; a single large boulder often looks better than several small ones. |
| 7 | Focal Specimen Trees or Sculptural Plants | One “star” plant anchors the entire bed visually and creates a memorable point of interest. | Choose specimens with multi-season appeal: a Coral Bark Maple for winter color, a Dogwood for spring flowers, or a contorted Harry Lauder’s Walking Stick. |
| 8 | Container Gardens / Planters as Anchors | Offers ultimate flexibility. Perfect for renters or to add seasonal color in high-impact spots. | Use a “thriller, filler, spiller” combo in large, weatherproof pots. Flank your front door or steps and refresh the plantings seasonally. |
| 9 | Edging & Curb Definition | The “finish carpentry” of landscaping. Creates crisp, clean lines that make everything look intentional and well-maintained. | Steel edging disappears for a modern look; brick or stone offers traditional charm. A deep edge also makes mowing easier. |
| 10 | Mulch & Groundcover Layer | The unifying element. Suppresses weeds, retains soil moisture, and gives beds a polished, complete look. | Apply 2-3 inches of organic mulch (shredded bark, arborist chips). For a living mulch, use low-growing groundcovers like creeping thyme or sedum. |
| 11 | Water Feature or Small Fountain | The sound of moving water masks street noise, creates a serene atmosphere, and acts as a natural focal point. | Use a recirculating pump system. A simple birdbath or bubbling urn is a low-maintenance starting point. |
| 12 | Sculptural Art & Garden Ornaments | Infuses your personality into the landscape. A single, well-placed piece can become a conversation starter. | Choose weatherproof materials (bronze, stone, high-quality concrete). Place where it can be discovered, like at the end of a path or peeking through foliage. |
| 13 | Native & Pollinator-Friendly Plant Zones | Reduces maintenance, water use, and chemical inputs while supporting local bees, butterflies, and birds. | Research plants native to your specific region. Coneflower, Salvia, and Milkweed are great starts for many areas. |
| 14 | Rain Garden or Bio-Swale at Entry Edge | Turns a drainage problem into an eco-chic feature. Manages stormwater runoff beautifully and sustainably. | Excavate a shallow basin and plant with moisture-loving natives like Switchgrass, Iris, and Joe-Pye Weed. |
| 15 | Reflective Surfaces for Light & Depth | Adds sparkle, amplifies light in shady spots, and creates an illusion of more space. | Use strategically: a mirrored globe, a panel of polished stainless steel, or even light-colored decorative gravel. |
Below, I’ll zoom into a few of the most impactful upgrades, sharing the step-by-step processes and hard-learned lessons from my own projects.
1. The Gateway Frame: From Idea to Anchored Installation
Why bother?
A gateway—be it a rustic cedar arbor or modern steel columns—gives your entrance psychological weight. It says, “You are now entering a cared-for space.” Without it, you risk a flat, unanchored walkway that visually bleeds into the lawn.
Step-by-step Implementation:
- Site Selection & Alignment: Use a garden hose to lay out the footprint. The gateway should align with your walkway’s center and feel proportional to your home’s scale—not too close, not too far.
- Material Choice for Longevity: I’ve had the best results with cedar (which ages to a lovely silver) or powder-coated steel. Avoid untreated pine, which will rot quickly.
- Foundations Are Everything: Dig post holes at least 24-36 inches deep (below your local frost line). Set posts in concrete, using a level to ensure they are perfectly plumb. This step prevents wobbly, unsafe structures.
- Assembly & Climbing Supports: Add crossbeams and trellis panels if desired. Ensure all connections are secure with galvanized or stainless steel hardware to resist rust.
- Plant Integration for Softness: Plant climbing vines like Clematis or American Wisteria at the base, amending the soil with compost. Train the tendrils upward as they grow.
Pitfalls & Pro Tips:
- Avoid the Squeeze: Don’t place the gateway so close to your house that it feels cramped. Leave a generous “negative space” to frame the view.
- Patience with Vines: Aggressive vines like Boston Ivy can damage wood and mortar. Opt for less invasive varieties and let the structure settle for a year before encouraging heavy growth.
- Light it Up: Consider integrating a small, downward-facing light on the crossbeam to illuminate the path below at night.
2. Walkway Reinvention: Curves, Materials & the Journey Itself
A walkway is more than a path — it’s the choreography of the visitor’s journey. A subtle curve can make the approach feel more exploratory and less utilitarian.
- Design Philosophy: Aim for a gentle, purposeful curve. The goal is to slow the journey down, not to create a confusing maze. Use the hose trick to visualize the flow before you dig.
- Material Logic & Choices:
- Flagstone: Offers an organic, high-end look but can be pricey and requires a stable base.
- Pavers: My go-to for DIY. They’re modular, come in various colors and shapes, and are easy to repair if heaving occurs.
- Decomposed Granite (DG): A cost-effective, permeable option that whispers “California casual.” It needs to be compacted and occasionally topped up.
- Material Logic & Choices:
- The Magic is in the Detailing:
- Use a soldier course of brick or metal edging to contain the path and add definition.
- Embed low-growing, walkable groundcovers like creeping thyme or Irish moss between flagstones for fragrance and softness.
- Always ensure a slight crown or slope to shed water and prevent puddling.
- The Magic is in the Detailing:
Implementation Checklist:
- Excavate 6-8 inches of soil.
- Lay and compact a 4-inch base of crushed gravel.
- Lay landscape fabric to suppress weeds.
- Set your chosen material (pavers, stone) in a bed of sand.
- Lock in the edges with sturdy edging material.
- Light the path with low-level, glare-free fixtures.
3. The Four-Season Planting Strategy: A Year-Round Canvas
Beautiful landscaping doesn’t have a seasonal blind spot. A thoughtful plant palette ensures there’s always something to catch the eye, from the stark beauty of winter to the exuberance of summer.
| Season | Plant Type & Role | Example Species & Tips |
|---|---|---|
| Winter | Evergreens, Structural Shrubs, Berry Plants | Boxwood, Blue Star Juniper, Winterberry Holly, Red Twig Dogwood (for red stems). |
| Spring | Bulbs, Flowering Shrubs, Early Perennials | Daffodils, Tulips, Hellebores, Flowering Quince, Lilac. Plant bulbs in fall for a spring surprise. |
| Summer | Blooming Perennials, Ornamental Grasses | Coneflowers, Salvia, Black-Eyed Susans, Fountain Grass. Deadhead spent flowers to encourage more blooms. |
| Fall | Foliage Color, Seed Heads, Late Bloomers | Japanese Maple, Burning Bush, Sedum ‘Autumn Joy’, Asters, Ornamental Grasses turning gold. |
Site-Adaptive Planting Tips:
- Respect the Microclimates: Note the sun patterns. Full-sun plants will struggle on a north-facing wall, while shade-lovers will fry in a west-facing bed.
- Think in Layers: Place taller structural plants (evergreens, small trees) at the back of beds, with mid-height shrubs and perennials in the middle, and groundcovers at the front.
- Succession is Key: Plan for successive bloom times so that as one plant fades, another takes center stage.
- Know Your Zone: In colder climates, know which perennials to cut back in fall and which (like ornamental grasses) provide winter interest if left standing.
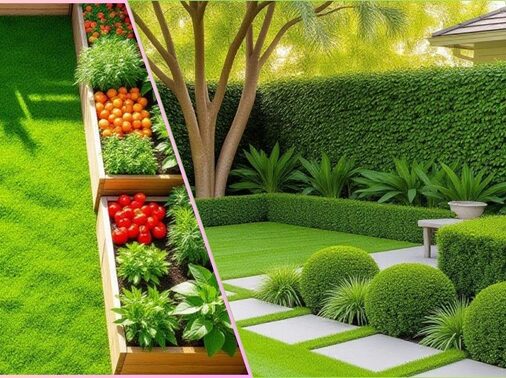
A Lesson from My Garden: I once planted a trio of Winterberry Holly shrubs, dazzled by their prolific red berries. What I didn’t realize was that they needed a male pollinator nearby to produce fruit. After a barren first winter, I planted a ‘Mr. Poppins’ pollinator nearby, and the following years were a spectacular display. Always research plant requirements—it saves time and disappointment.

Layering plants of different heights creates depth and year-round interest. (Credit: HomeDIYIdeas)
4. Accent Lighting: Beyond “Pretty” to Purposeful
Lighting is the jewelry of the landscape, but its function is as important as its form. A well-lit entrance is safer, more secure, and utterly magical after dark.
Professional Lighting Strategies:
- Uplighting: Place fixtures at the base of a specimen tree or architectural feature to graze the bark and cast dramatic shadows.
- Path Lighting: Use low bollards or well lights to wash the walking surface with light, preventing trips and falls.
- Silhouetting/Backlighting: Position a light behind a plant with interesting form (like ornamental grass) to create a glowing halo effect.
- Step Lighting: Integrate small, recessed lights into stair risers or walls for safety and a high-end look.
- Moonlighting: For a truly professional touch, place a fixture high in a tree to cast a soft, dappled light on the ground below, mimicking moonlight.
Installation & Product Tips:
- Stick with a 12V low-voltage system for most residential applications; it’s safer and easier for DIY.
- Always bury cabling in conduit to protect it from shovels and rodents.
- Use a timer or smart controller to automate your lights, saving energy and ensuring consistency.
- Avoid “light pollution”: Use shields to direct light downward and prevent it from spilling into neighbors’ windows or the night sky.
5. The Eco-Conscious Entrance: Rain Gardens & Native Zones
If your property has a soggy spot or you simply want to reduce your environmental footprint, integrating a rain garden or native plant zone is both stylish and smart. It says, “This home works with nature.”
Container gardening and layered beds create a welcoming porch vignette. (Credit: HomeDIYIdeas)
How to Design a Functional Rain Garden:
- Locate the Flow: During a heavy rain, watch where water naturally pools or runs. The best spot is 10+ feet from your foundation, in full to partial sun.
- Excavate the Basin: Dig a shallow depression 6-12 inches deep with a flat bottom. The size should be about 20-30% of the roof area draining into it.
- Create a Healthy Soil Mix: Amend the native soil with compost and sand to improve infiltration and plant health.
- Plant with Water-Loving Natives: Choose plants that can handle both “wet feet” and dry spells. Excellent choices include Switchgrass, Blue Flag Iris, Cardinal Flower, and Joe-Pye Weed.
- Manage Overflow: Include an overflow outlet, like a gravel spillway, to handle water during extreme downpours.
In my own yard, a persistent wet spot near the driveway became an eyesore. Instead of fighting it, I regraded the area into a gentle swale that directed water into a newly created rain garden. Planted with sedges, Joe-Pye weed, and swamp milkweed, it now teems with pollinators and has completely solved the erosion issue, all while looking like a intentional, beautiful garden feature.
A Realistic, Phased Implementation Plan
Tackling all 15 ideas at once is a recipe for burnout and budget blowout. Here’s a 3-phase roadmap I’ve used successfully with clients and in my own projects to create lasting, manageable change.
Phase 1: The Foundation & Circulation (Season 1)
- Conduct a Site Audit: Check grading, drainage, and soil. This is non-negotiable.
- Install/Upgrade the Walkway (Idea #2) – this defines the primary traffic flow.
- Define Beds with Edging (Idea #9) – creates the “rooms” for your garden.
- Build the Gateway Frame (Idea #1) – establishes the entry point.
Phase 2: Structure & Planting Core (Season 2)
- Plant for Structure & Seasons (Ideas #3, 4) – install evergreen anchors and key shrubs.
- Place Your Focal Specimen (Idea #7) – this is your “wow” moment.
- Add Containers for Flexibility (Idea #8) – introduce color and texture.
- Apply Mulch & Groundcover (Idea #10) – unifies the beds and suppresses weeds.
Phase 3: Details & Finishing Touches (Season 3+)
- Install the Lighting Plan (Idea #5) – brings the garden to life at night.
- Add Hardscape Accents & Art (Ideas #6, 12) – personalizes the space.
- Integrate Water Features (Idea #11) – adds sound and movement.
- Establish Native/Pollinator Zones (Idea #13) – enhances sustainability.
- Build the Rain Garden (Idea #14) – solves drainage elegantly.
Treat this roadmap as a multi-seasonal timeline. Install hardscape in the cooler fall or early spring, plant in early spring or fall, and add the finishing touches like lighting once the main structures are in place.
Real-World Case Snapshots: Lessons from the Field
- Case A: The Suburban Symmetry Project
A 1950s ranch home with a 50-foot frontage. The goal was to create a grander feel. We installed a symmetrical gateway with black steel columns, a meandering flagstone path, and soft waves of Blue Fescue grass. The result was a powerful, framed entrance. The Lesson: The initial plan skipped a drainage audit. After the first heavy autumn rain, water pooled near the foundation. We had to retrofit a French drain—a valuable lesson in always starting with site diagnostics.
- Case A: The Suburban Symmetry Project
- Case B: The Sloped Lot Challenge
A modern home on a steeply sloped lot. Instead of fighting the slope, we terraced it with dry-stack retaining walls, creating three distinct planting levels. On each terrace, we repeated dwarf conifers and seasonal containers, turning a challenging climb into a rewarding, garden-like ascent. The Lesson: Terracing can transform a liability into your property’s most dynamic feature.
- Case B: The Sloped Lot Challenge
The common thread in every project? What’s underneath matters as much as what’s on the surface. Proper grading, drainage, and soil preparation are the unsung heroes of any successful landscape.
Conclusion
Your front yard entrance is a unique canvas where structure, plant life, light, and water converge to tell a story. When you upgrade with intention and strategy, you do more than just raise your curb appeal—you create an experiential threshold that welcomes you home and impresses every guest.
The journey to a beautiful entrance begins with a single step. I encourage you to pick two ideas from this guide—one structural, one aesthetic—and commit to executing them this season. As they mature, your space will evolve and your confidence will grow.
Meet the Author

![Backyard Bliss: Creative Ways to Transform Small Outdoor Spaces [small backyard landscaping ideas]](https://homediyideas.com/wp-content/uploads/2025/10/Backyard-Bliss-Creative-Ways-to-Transform-Small-Outdoor-Spaces-small-backyard-landscaping-ideas-120x120.jpg)